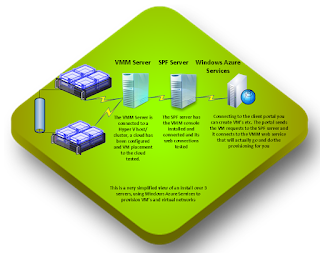
So what we have here is a Hyper V cluster (but you could also be using ESX or ZEN) that is acting as a hyper visor, Virtual Machine Manger (VMM) is managing your hyper visor environment and into this environment you have deployed at least one cloud. This is the standard System Center cloud stack. The next two components are the magic that make this work. The first component is Service Provider Framework
 (SPF), SPF is a web services that connects to VMM and exposes VMM admin
tasks to the web. SPF has become a simple install that requires almost
no configuration and requires that the VMM console be installed and configured
to connect to the VMM server. Lastly we have the Windows Azure Services
installed on a single server (not recommended for production). The install
creates a ton of web sites, 12 to be exact and there are 2 that are of interest
straight away, the admin portal https://servername:30091 and the tenant portal
on https://servername:30081. Using the admin portal you can:
(SPF), SPF is a web services that connects to VMM and exposes VMM admin
tasks to the web. SPF has become a simple install that requires almost
no configuration and requires that the VMM console be installed and configured
to connect to the VMM server. Lastly we have the Windows Azure Services
installed on a single server (not recommended for production). The install
creates a ton of web sites, 12 to be exact and there are 2 that are of interest
straight away, the admin portal https://servername:30091 and the tenant portal
on https://servername:30081. Using the admin portal you can:- Connect to your VMM environment, define your plans and link them to your clouds
- Configure user accounts to access the tenant site. Right now the user access is only through an email/password combination and is not AD integrated (yet).
- Configure your data base servers SQL or MYSQL
- Configure a connection for web site deployment
- Create and manage VM's
- Create virtual networks
- Create SQL DB's
In the image below you can see the tenant portal connected to a VM. Once a VM has been created in the portal we get a performance view of CPU, Storage and Network on the top, with VM management tools like a RDP to make a console connection and a number of VM tasks direct from the portal, and lastly we get the quick glance view to cover things like the VM name, IP and OS type.
So we are not using AD integration for user access is this really suitable to the enterprise? With this version there is no AD integration but you could use a System Center Orchestrator to import users from AD and pre-populate accounts for us. The features and power of this product make it a fit for the Hoster and Enterprise client alike and future releases of Windows Azure Services are only likely to get better.
So what are your next steps? Well to start off download the bits you need to get started with the portal and you can get them here


No comments:
Post a Comment